Usually when you want to buy a car, you want to take it for a drive. As the name implies, you go for a test drive. Then, the car can be said to be test-driven. Funny word play, right? In the case of cars, you, the user, want to be the one that tests it before giving your hard-earned money for it.
But now let’s talk about code. When a user utilizes your application, or, even better, pays money in order to use it, he has a similar kind of expectations: he/she expects the application to be test-driven. Meaning, the application should have been tested before for possible errors, and not by the user. Thus, the responsibility of testing the code that builds that app sits with the developer. This is what the term test-driven development implies, that the developer tests the code in the process of writing it.
If the code is not properly tested and someone uses it, it may cause what is called a crash. Just like with cars, which, if something malfunctions due to factory issues , it may crash. Hence, we expect both the cars and the code we use are properly tested, at least before they get out of the factory.
You don’t want the code to crash, not work properly or have vulnerabilities.
You have to test it. And you can do it in the process of development. Almost no one writes tests after the code is finished and working.
How to start test driven development
First thing to do is find out the method and the best practices for testing your code in your programming language of choice. For example, for Python you could go with Pytest, for Rust you can go with its default cargo test.
Afterwards, whenever you neet to write a new module, feature or function, and that function makes sense to be tested (which we will cover up later), start with creating the test file for the feature that you want to write. It can follow the same name with .test at the end, or whatever the documentation recommends.
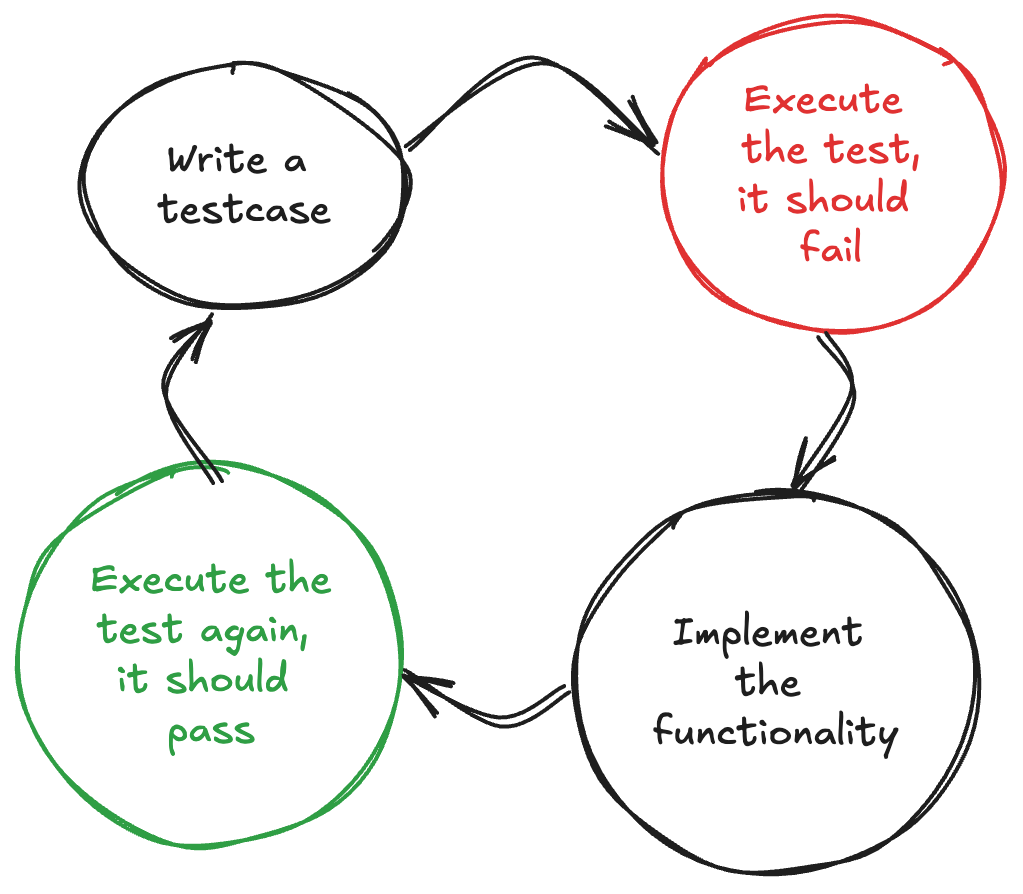
Then, the cycle from the next diagram has to be followed:

- Write a testcase for the soon to be functionality. Imagine the code exists already and, running the test, it should do what the test expects.
- Execute the test. As the code is not implemented, it will most certainly fail. And that is fine, make it fail.
- After the test fails, go and implement the functionality. You should write enough code just to make the testcase to pass. No more, no less.
- Execute the test again. It should now pass. Now, repeat the whole cycle.
As you have more testcases, you may need to modify the code to match all the tests. And that is fine. The purpose is to develop code incrementally and in the process to address edge-cases and reduce the bug area as much as possible. It is normal for the implementation to get more complicated.
Remember, having those tests already in place will allow refactoring the code without breaking its functionality, as you always run the tests after each change. And this is powerful, as it makes the code fail proof in a lot of cases.
Tips and tricks to consider
- Always make the testcases small at first, to cover the basic functionality, and go more complex as the necessity arises
- Take a moment to breath and re-focus on what has to be done. I recommend writing in a document or on paper what you want to implement, and then how you would test it. Set a clear period of time (10-20 minutes at least) in which to just think about the feature. Allow yourself to be creative.
- If it looks like you spend more time writing tests instead of just writing the code directly, you are right. Implementing tests will of course will have its overhead. But it will be way smaller than having bugs in the future and looking for a solution, wanting to change something and tread very carefully as to not break something, or thinking if that edge-case is handled or not. So, spend less time at the beginning, than more time along the way.
- Testing in advance actually helps you develop the feature more easily, as every step is taken incrementally. Thus, the overall development time could be reduced as everything is organized and covered.
When not to test
There is code that makes no sense to be tested. Avoid testing the following:
- getters/setters
- boilerplate code
- logging
- third-party libraries
- frameworks
- code that has no logic or just calls other functions without altering their behaviour
Pitfalls
There are some pitfalls to be careful of when TDD-ing. I recommend concentrating on the following:
- Don’t spend too much time testing so that you lose the sight of the larger picture. It is important to test, but it is important to also deliver something. Find the balance on how much testing vs how much development should go.
- Testing should guide development, not dictate it entirely. Think all the time about what you need to achieve.
- Don’t over-engineer tests. Complex and rigid tests can be hard to maintain if the code-base evolves.
- While TDD focuses on unit tests, dont lose sight of integration and e2e tests. They are also necessary.
Conclusion
Just like test-driving a car, test-driven development ensures you’re building something reliable, safe, and ready for the road ahead.
By testing early and often, you minimize the chances of your code crashing unexpectedly, just as you would expect a car not to break down right after leaving the dealership. It’s not just about avoiding bugs but also about building confidence in your code, knowing that it can handle whatever curveballs are thrown its way.
So, take the time to write those tests, even when it feels like extra work. In the end, you’ll be driving smoother, with fewer bumps along the way, and your users will thank you for the quality and stability you’ve built into the system from the start. Keep in mind that not everything needs a test, but when it does, make sure you’re behind the wheel, controlling the outcome, not just reacting after a crash.
